Topics cover the basic system configurations for SC Macintosh clients running Leopard (OS X 10.5.x). Configurations for Tiger may vary somewhat. They allow users without local accounts to access the computer via LDAP. User files can also be saved on the network in a transparent manner. This is ideal for public Macintosh systems. Individual Macs can be configured as such with a slight twist: Mobile accounts. It provides the consistency and convenience of tapping into department resources and yet allows the freedom to logon when off campus.
Configure the System to Use LDAP Authentication
It may be necessary to reboot when LDAP settings have changed.
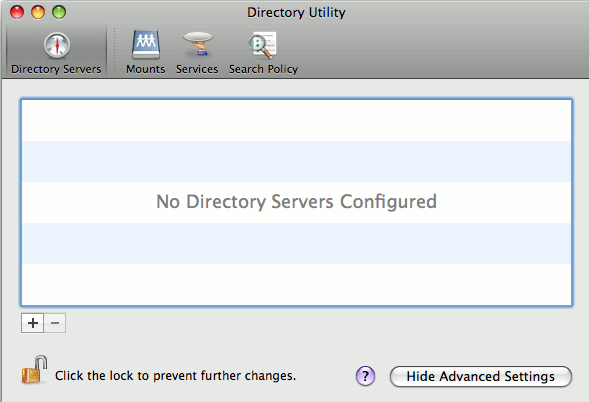
- Start /Applications/Utilities/Directory Utility or /System/Library/CoreServices/Directory, unlock and show advanced settings if needed. You need administrator access to make any changes.
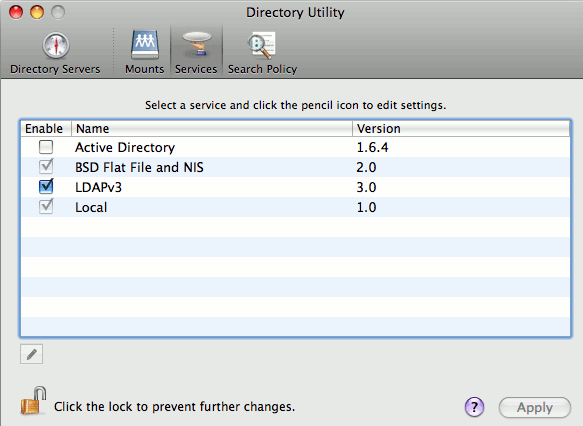
- Under "Services" tab, edit LDAPv3
- Click on "New..." button
- Server Name or IP Address: ldap-vm0.sc.fsu.edu. Make sure "Encrypt using SSL" is unchecked, otherwise authentication will fail. As of this writing, this is a bug in Leopard. We can correct this setting later.
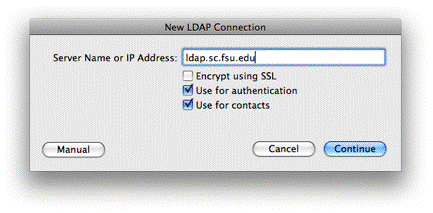
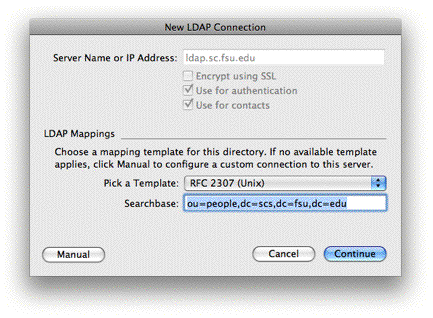
- Continue and choose template: RFC 2307 (Unix) and enter searchbase: ou=people,dc=sc,dc=fsu,dc=edu
- Save is as "LDAP" under "Configuration Name", click on "OK" to finish
- Earlier than Leopard, secure LDAP connection is not mandated. Modify the mandate by editing
/etc/openldap/ldap.conf
TLS_REQCERT demand ==> TLS_REQCERT allow
Configure the System to Use LDAP SSL to Authenticate
- Assume LDAP authentication is configured already and you need administrator privilege
- Directory Utility
Services
LDAPv3
Encrypt using SSL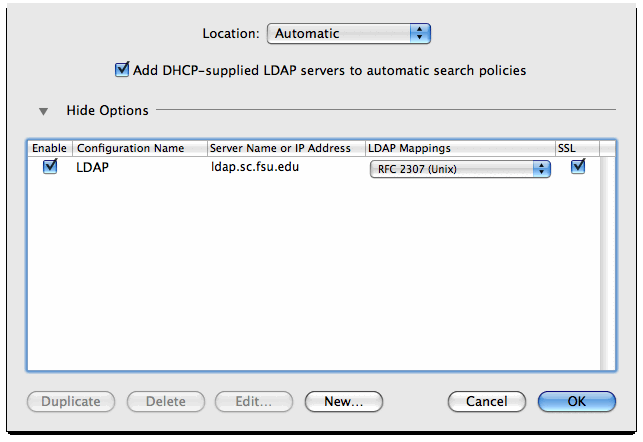
- Append the following to file /usr/share/curl/curl-ca-bundle.crt
Go Daddy Class 2 CA
===================
-----BEGIN CERTIFICATE-----
MIIEADCCAuigAwIBAgIBADANBgkqhkiG9w0BAQUFADBjMQswCQYDVQQGEwJVUzEhMB8GA1UEChMY
VGhlIEdvIERhZGR5IEdyb3VwLCBJbmMuMTEwLwYDVQQLEyhHbyBEYWRkeSBDbGFzcyAyIENlcnRp
ZmljYXRpb24gQXV0aG9yaXR5MB4XDTA0MDYyOTE3MDYyMFoXDTM0MDYyOTE3MDYyMFowYzELMAkG
A1UEBhMCVVMxITAfBgNVBAoTGFRoZSBHbyBEYWRkeSBHcm91cCwgSW5jLjExMC8GA1UECxMoR28g
RGFkZHkgQ2xhc3MgMiBDZXJ0aWZpY2F0aW9uIEF1dGhvcml0eTCCASAwDQYJKoZIhvcNAQEBBQAD
ggENADCCAQgCggEBAN6d1+pXGEmhW+vXX0iG6r7d/+TvZxz0ZWizV3GgXne77ZtJ6XCAPVYYYwhv
2vLM0D9/AlQiVBDYsoHUwHU9S3/Hd8M+eKsaA7Ugay9qK7HFiH7Eux6wwdhFJ2+qN1j3hybX2C32
qRe3H3I2TqYXP2WYktsqbl2i/ojgC95/5Y0V4evLOtXiEqITLdiOr18SPaAIBQi2XKVlOARFmR6j
YGB0xUGlcmIbYsUfb18aQr4CUWWoriMYavx4A6lNf4DD+qta/KFApMoZFv6yyO9ecw3ud72a9nmY
vLEHZ6IVDd2gWMZEewo+YihfukEHU1jPEX44dMX4/7VpkI+EdOqXG68CAQOjgcAwgb0wHQYDVR0O
BBYEFNLEsNKR1EwRcbNhyz2h/t2oatTjMIGNBgNVHSMEgYUwgYKAFNLEsNKR1EwRcbNhyz2h/t2o
atTjoWekZTBjMQswCQYDVQQGEwJVUzEhMB8GA1UEChMYVGhlIEdvIERhZGR5IEdyb3VwLCBJbmMu
MTEwLwYDVQQLEyhHbyBEYWRkeSBDbGFzcyAyIENlcnRpZmljYXRpb24gQXV0aG9yaXR5ggEAMAwG
A1UdEwQFMAMBAf8wDQYJKoZIhvcNAQEFBQADggEBADJL87LKPpH8EsahB4yOd6AzBhRckB4Y9wim
PQoZ+YeAEW5p5JYXMP80kWNyOO7MHAGjHZQopDH2esRU1/blMVgDoszOYtuURXO1v0XJJLXVggKt
I3lpjbi2Tc7PTMozI+gciKqdi0FuFskg5YmezTvacPd+mSYgFFQlq25zheabIZ0KbIIOqPjCDPoQ
HmyW74cNxA9hi63ugyuV+I6ShHI56yDqg+2DzZduCLzrTia2cyvk0/ZM/iZx4mERdEr/VxqHD3VI
Ls9RaRegAhJhldXRQLIQTO7ErBBDpqWeCtWVYpoNz4iCxTIM5CufReYNnyicsbkqWletNw+vHX/b
vZ8=
-----END CERTIFICATE-----
- Append the following line
TLS_CACERT /usr/share/curl/curl-ca-bundle.crt
to file /etc/openldap/ldap.conf and make sure to restore allow to demand (default for Leopard)
TLS_REQCERT allow ==> TLS_REQCERT demand
Automount Configuration for Remote Homedirectory
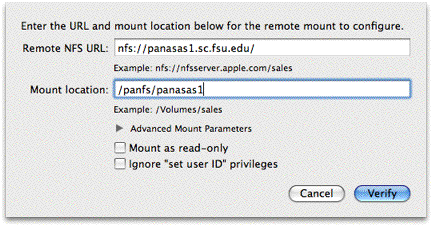
- Start "Directory Utility" as before, select "Mounts" tab
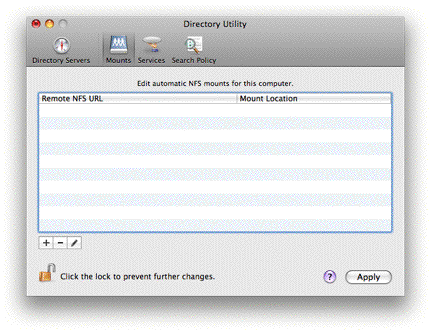
- Remote NFS URL: nfs://pan-nfs.sc.fsu.edu/
Mount location: /panfs/panasas1
NOTE: The trailing slash in the URL is critical. The absence of trailing slash in the mount location is also important.
Configure System to Use CUPS Printers
If users prefer more options and better control with printers, refer to network printer setup and install them with native drivers. Using CUPS printers, the administrative overhead is minimal.
Login as administrator and create or edit /etc/cups/client.conf
ServerName cups.sc.fsu.edu
Now users should have direct access to all CUPS printers (reboot if necessasry). All jobs will be printed as black and white by default unlike in most other cases where color is the default.
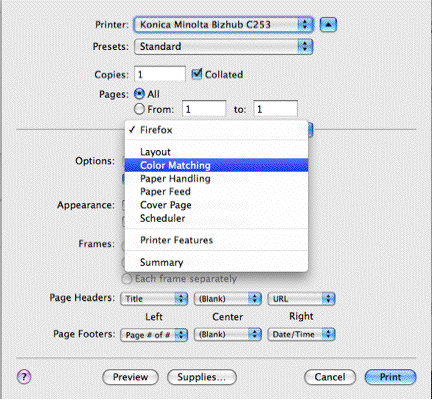
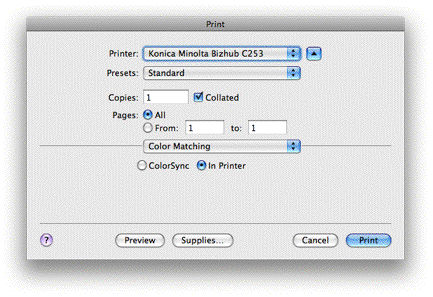
- How to print in color via CUPS printers?
Select "Color Matching" under Options and then "In Printer"
